Process Server Websites

How To Build A Process Server WordPress Website

Do you need a website for your process serving business?  Do you want to get your own process server clients online?  You need a process server website.  

I build process server websites using WordPress.  The process is super easy.  No Coding is needed.  Mostly cut and paste.

Watch the video below.  I built a Process Server WordPress Website in less than 30 minutes.

6 Steps To Build A Process Server WordPress Website

Step 1.  Choose A Domain Name

Step 2.  Select a Web Hosting Provider and Register a Domain Name for Free

Step 3.  Use a Theme or Design for Your Website

Step 4.  Install Plugins (Optional)

Step 5. Configure Important Site Settings

Step 6.  Set up Important Webpages and Promote Your Site

Step 1. Choose A Domain Name

process server domain name

Your process server domain name is your identity on the internet. It’s how your audience will find you and identify your process serving company.

You have complete freedom to choose your domain name, though. You can choose any name you want—provided it is available and not registered by other companies.  I recommend that you choose a process server domain name that includes the city, county or neighborhood that you serve in.

Step 2. Select a Web Hosting Provider and Register a Domain Name for Free

There are hundreds of companies that sell web hosting services and tons of companies that allow you to register a new domain name. But wouldn’t it be more convenient to choose a company that offers you both services?  I recommend HostGator. 

Just head to the HostGator website using this link, click Buy Now for the Baby Plan. That’s the most affordable hosting package that includes a free domain and multiple process server websites. 

Step 3.  Use a Theme or Design for Your Website

Themes are interchangeable designs that allow you to change how your Process Server WordPress website looks at the touch of a button. 

wordpress themes

Install Your Chosen Theme
To choose a process server WordPress website theme, all you have to do is hit Install right away. Here’s how to go about it:

Go to Appearance, followed by Themes, and then click on Add New. Enter the name of the theme you want to install in the search bar, and then click on the Install button under your desired theme.

After the installation, click on Activate to enable the thing on your website.

Step 4. Install Plugins (Optional)

You can consider installing plugins to boost the functionality of your process server website. Think of them as applications for your mobile phone.

Here are the plugins that I use:

  • Yoast SEO

  • Classic Editor

  • Gravity Forms

gravity forms

Step 5. Configure Important Site Settings

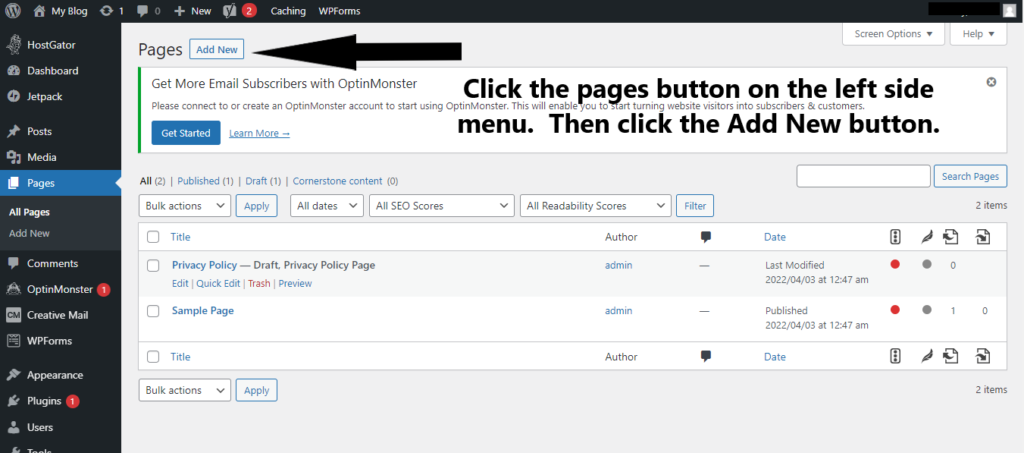
In your WordPress dashboard, click on Settings from the side menu and go to Permalinks.


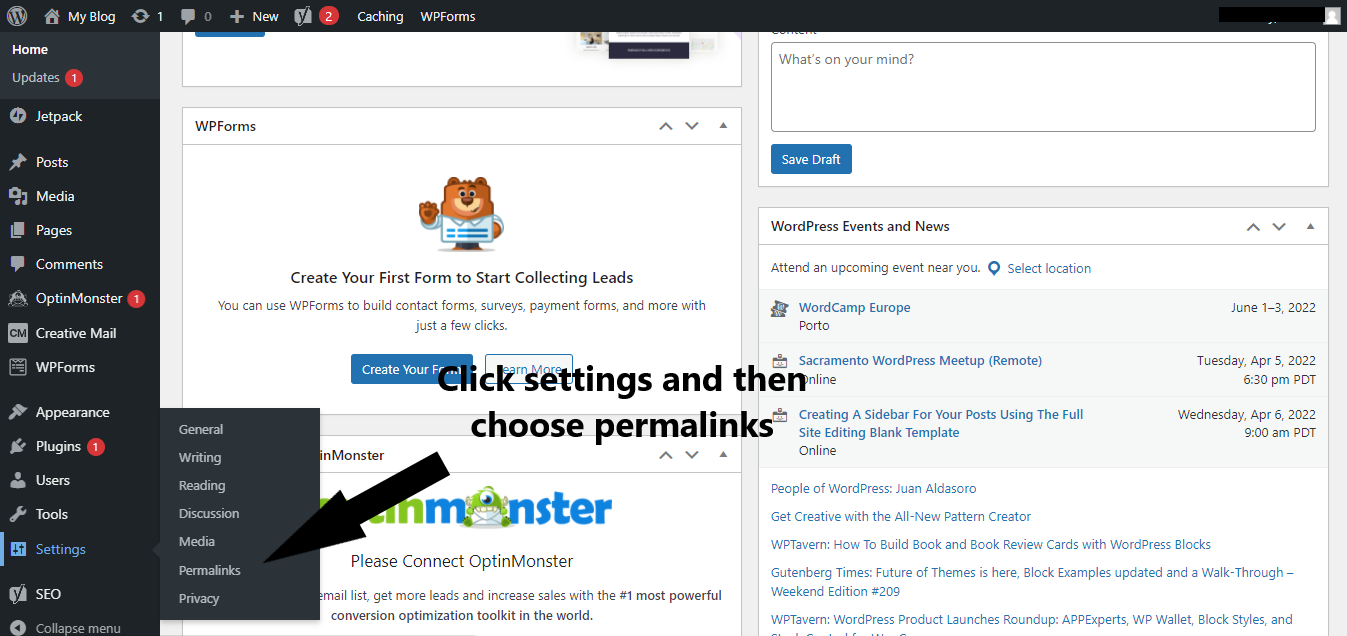
Under the Common Settings field, click on Post Name.
Once you’re done, click on Save to save the changes.

Step 6. Set up Important Webpages and Promote Your Site

With your website ready, you can now focus on creating high-quality content that helps you boost your traffic and conversions. Start by creating essential webpages like Home, Services, Contact Form, Blog & Privacy Policy.

Here Are Some Of My Process Server WordPress Websites